Programming club Welcome event: Learn to make your own profile page for employers.
Hey everyone,
You probably got here for our the RMIT Programming Club Welcome event. So here we are going to make our own profile webpage! These websites are the programmer’s alternative to a Resume, and is often much more interesting for employers, and can show your skill as well as tell it.
For instance, you should check out Patrick Misfud’s profile page. It’s an exceptional example of a profile page.
So without further ado, let’s get into it!
1. Creating a GitLab account
To start, you will need a GitLab account. GitLab is a platform that allows sharing and collaboration when developing software.
Why GitLab? The more famous platform out there for collaborating on software is GitHub. However, they have recently changed their features to not include website hosting for free users. This is a problem for us. Also, GitLab has a much larger feature set when it comes to testing and deploying the software.
GitLab also tracks your contribution to software projects, and therefore also serves as yet another resume, and is definitely checked by employers.
We’ll be using it to host code for your profile page. So Sign up for GitLab. I would recommend using your personal email, as you loose access to your RMIT email after you graduate.
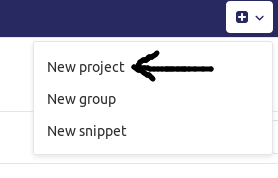
2. Create a new project
A project in GitLab is a place to store your code for a particular project.
You can create a project by clicking the plus in the in the top right then “New project”

Select “Create from template” then “Use template” next to “Pages/Plain HTML”


name your repositry
[username].gitlab.io
replacing [username] with your github username in lower case. For instance. if your username is “hazelfire” (as mine is), then:
hazelfire.gitlab.io
Add a description if you wish, make the project public.
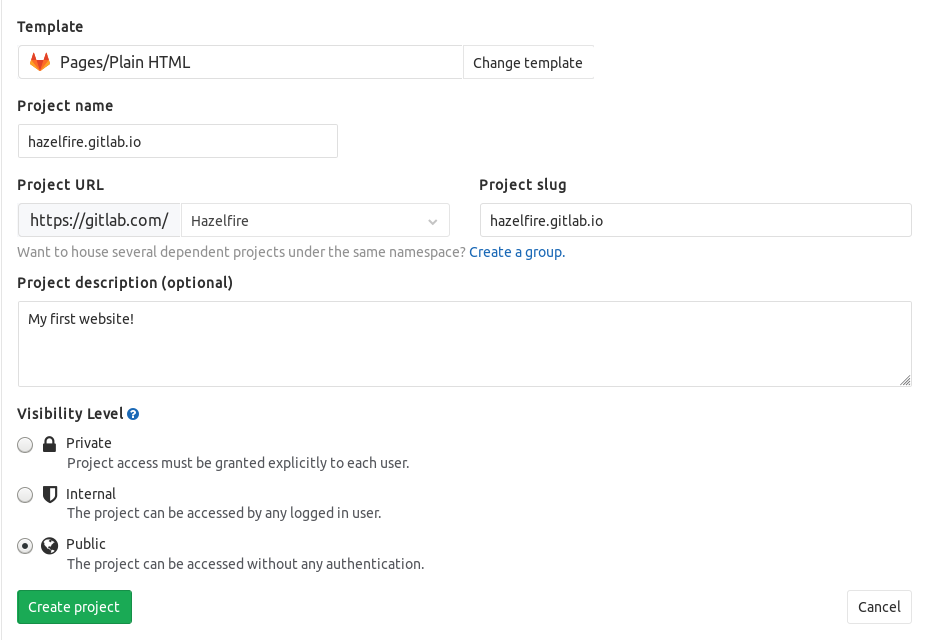
Click “Create project” to finish creating your project.
4. Change your template code
We have created a template for you to start off with. You can download it here: link.
Download the zip file and extract it into a new folder. You will have index.html and index.css. Index.html contains the content of your website, whereas index.css contains the styling rules. So open up index.html.
These files are both plain text files, and you will need a program that can open them. For Windows, Notepad will do just fine. For Mac, TextEdit will also work. Your computer will probably not open these files with those programs by default. So you will need to use “Open With” to get to them.
This is HTML, the coding language of the internet. Fill in the template so that the page applies to you. Then save.
As a side note, as you will be coding a lot in the future. It’s a good idea to invest in a good text editor. I would recommend “Sublime Text” if you want something simple that works, or “VS Code” if you want the full experience.
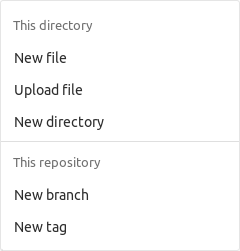
5. Upload the code
Now we can upload the code! Go to your gitlab project page and open the public folder. Then click the plus next public/ and click “Upload file”


Add your index.html. Leave everything else as default.
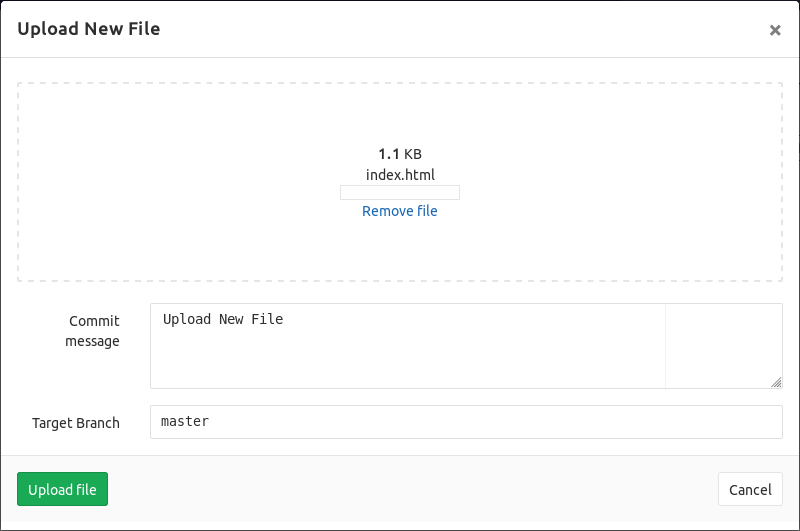
Click upload changes.
Do the same for index.css and you’re done! You just made your profile website! check out [username].gitlab.io to see it!
6. What’s next?
Now that you’re done, you should help other people with getting their website up and running, or maybe install a nicer text editor.
Also, if you are interested, we will be showing off your pages on our programming club website, so be sure to tell us your username! If you don’t want to show it off, you don’t have to.
However, if you want to get really serious, you should learn some more HTML and create a more interesting website! Try looking up how to make your profile page unique, or ask around for how to do specific things with HTML and CSS.
