Nao bot workshop
Nao Workshop
Ready to program some bots?
Do you have a Nao lying around? If not. Go buy one! They’re only $7990 USD (10,720 AUD)! Bargain! We’ll wait around.
Oh wait, you tell me that you don’t have a spare 10 grand lying around? Well, that’s a shame…
Oh wait, I think I have a spare lying around…. here he is!
Thankfully, you can actually have your very own Nan robot without selling your soul.
Seems to good to be true? Well it isn’t!
It’s called Webots. It’s an open source robotics simulator. It allows you to play with all sorts of robots on your computer.
We’ll be using it for this tutorial. If you want to follow along with this tutorial on your computer. Go ahead and install the software.
If you are having trouble installing. That’s totally fine. You can always come back, and I’ll even have little embeds so you can feel like you’re getting everything done in your browser!
Okedoke. Today we’ll be using webots to simulate and control a little e-puck robot. It comes from tutorial 1 from Webots.
Open up Webots!
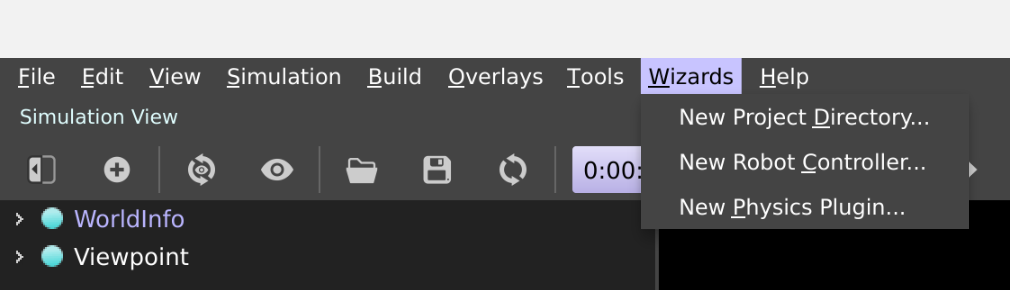
We’ll be creating a new project directory with the wizard tab at the top:
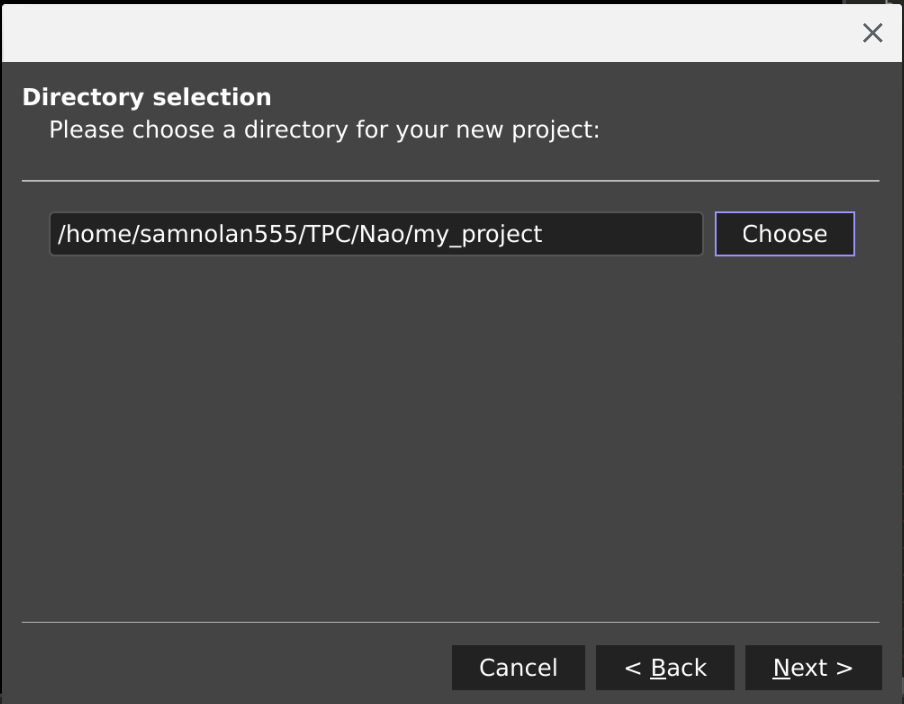
Click Next. Then choose a directory to create the project.
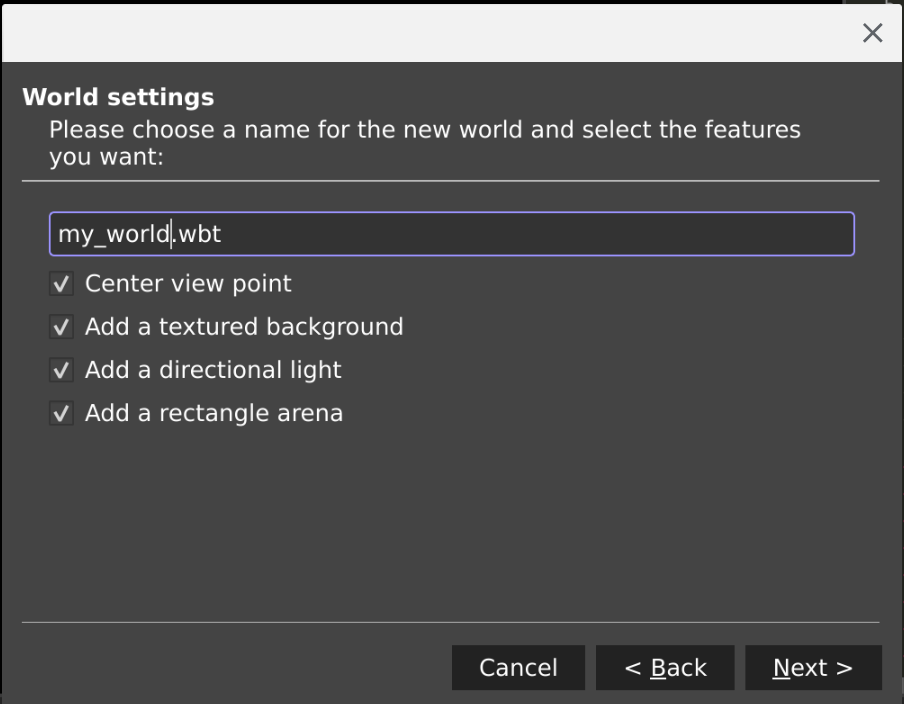
And finally, check the final box saying you want a rectangle arena.
You now have an arena! You can now put things inside this arena to play with.
On the left you can see all the elements of your world. Click on the RectangleArena, then press the add button at the top to add the e-puck robot. Video is below:
We have our first robot! Watch him running around.
Each robot has a controller attached to it which controls the robot. A controller is the code that controls robots, and the default controller for this robot simply rolls around the scene avoiding obstacles.
Let’s give him some more things to avoid… Crates!
Follow this video:
Select the rectangle arena, then press the add button and search or “Box”, then select wooden box. It’s way too big, so select the drop down to the left of the wooden box, then modify the scale to 0.1 x 0.1 x 0.1, and translation y to be 0.05. You can then Ctrl-C + Ctrl-V your way to more crates!
You should have a scene like this! Except the robot should be moving around.
Now to get down to business.
The greatest thing with Webots is that you can code your robots right from your simulation!
We’ll start with creating a brand new controller. You can do that through the controller wizard:
The code for the controller should now show up on the right.
I would recommend at this point to save your world! Saving as always good.
Let’s start coding!
Let’s add this controller to start with:
#include <webots/robot.h>
#include <webots/motor.h>

#define TIME_STEP 64

int main(int argc, char **argv) {
 wb_robot_init();

 WbDeviceTag left_motor = wb_robot_get_device("left wheel motor");
 WbDeviceTag right_motor = wb_robot_get_device("right wheel motor");

 wb_motor_set_position(left_motor, 10.0);
 wb_motor_set_position(right_motor, 10.0);

 while (wb_robot_step(TIME_STEP) != -1);

 wb_robot_cleanup();

 return 0;
}
This code is simple! It gets the controllers on the device, then sets the position of the motors so that it can roll forward. It then stops after the wheel rotate 10 radians.
We then need to build and add the controller.
Now… for phase 2! Here’s your code. All it does is try and wait for keyboard input, and when you press up and down, the puck will move forward and backwards!
#include <webots/robot.h>
#include <webots/motor.h>
#include <webots/keyboard.h>

#define TIME_STEP 64

#define MAX_SPEED 6.28

int main(int argc, char **argv) {
  wb_robot_init();

  WbDeviceTag left_motor = wb_robot_get_device("left wheel motor");
  WbDeviceTag right_motor = wb_robot_get_device("right wheel motor");
  wb_motor_set_position(left_motor, INFINITY);
  wb_motor_set_position(right_motor, INFINITY);

  double speed = 0.5;
  wb_keyboard_enable(50);
  while (wb_robot_step(TIME_STEP) != -1) {
    int key = wb_keyboard_get_key();
    switch(key){
      case WB_KEYBOARD_UP:
        wb_motor_set_velocity(left_motor, speed * MAX_SPEED);
        wb_motor_set_velocity(right_motor, speed * MAX_SPEED);
        break;
     case WB_KEYBOARD_DOWN:
        wb_motor_set_velocity(left_motor, -speed * MAX_SPEED);
        wb_motor_set_velocity(right_motor, -speed * MAX_SPEED);
        break;
     default:
        wb_motor_set_velocity(left_motor, 0);
        wb_motor_set_velocity(right_motor, 0);
    }
  }

  wb_robot_cleanup();

  return 0;
}
Keep in mind that to control the robot, it must be selected.
As a final addition, add the following cases (you can probably work out what they do):
case WB_KEYBOARD_RIGHT:
    wb_motor_set_velocity(left_motor, speed * MAX_SPEED);
    wb_motor_set_velocity(right_motor, 0 * MAX_SPEED);
    break;
case WB_KEYBOARD_LEFT:
    wb_motor_set_velocity(left_motor, 0 * MAX_SPEED);
    wb_motor_set_velocity(right_motor, speed * MAX_SPEED);
    break;
And you’re done! You’re own little minion….
Have fun playing with robotics
